이전 상황
라즈베리 파이에
/////
우선 jetson nano에 우분투를 설치
https://deep-eye.tistory.com/56
[Jetson] Nvidia 젯슨 나노 (Jetson Nano) OS 설치 및 초기화 가이드
Jetson Nano 젯슨 나노는 NVIDIA에서 제작한 딥러닝용 보드로 GPU 연산이 가능한 프로세서를 탑재하여 CUDA를 활용한 이미지 프로세싱과 딥러닝 연산이 가능합니다. 가격 또한 저렴?하여 다양한 산업용
deep-eye.tistory.com
mavlink 설치
https://mavlink.io/ko/getting_started/installation.html
MAVLink 설치하기 · MAVLink Developer Guide
Installing MAVLinkThis topic explains how to install the MAVLink toolchain, including both XML message definitions and the GUI/command line tools that use them to Generate MAVLink Source Files.You do not need to install or generate the source files if you
mavlink.io
sudo apt install python3-pip
pip3 install --user future
sudo apt install python3-lxml libxml2-utils
sudo apt install python3-tk
git clone https://github.com/mavlink/mavlink.git --recursive
PYTHONPATH=path_to_root_of_cloned_mavlink_repository
추가 모듈 설치
sudo pip3 install pymavlink
sudo pip3 install mavproxy
mavlink 실행
sudo -s
mavproxy.py --master=/dev/ttyS0 --baudrate 921600 --aircraft MyCopter
실행시 linkdown 이라는 에러 발생

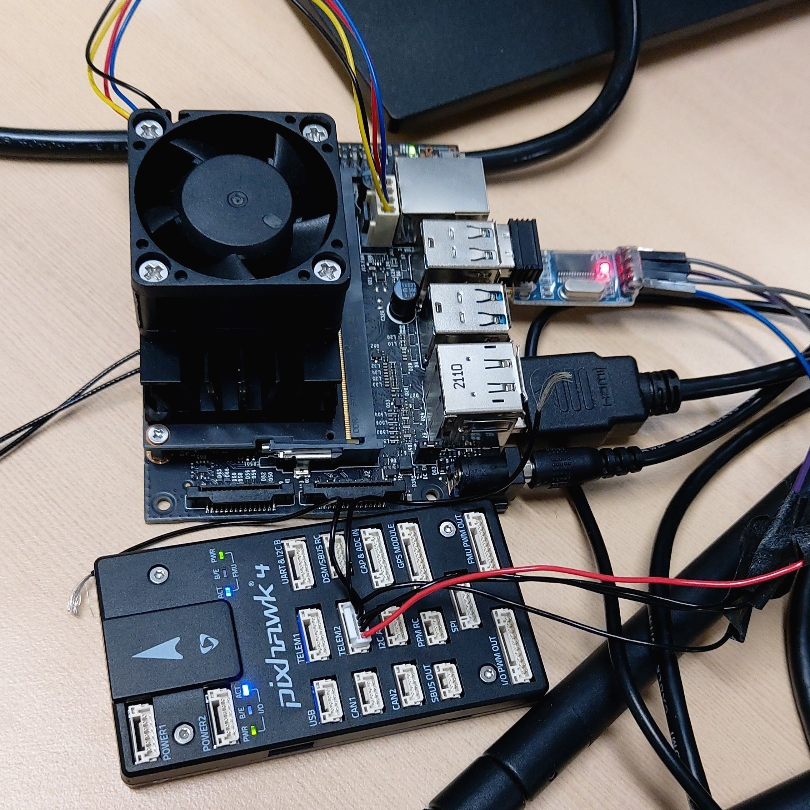
젯슨과 px4를 ttl로 연결함
이때 px4의 기본 serial 통신 속도 - telem1 : 57200 - telem2 : 921600
//////
우분투에서 minicom으로 시리얼 통신 하기
리눅스에서 minicom을 이용하여 시리얼 통신을 하는 과정
velog.io
serial 연결이 제대로 안되있어 그런지 확인하기 위해 minicom을 사용하여
sudo apt-get install minicom -y#연결된 포트 확인
dmesg | grep tty# 연결전

# 연결후

ttyACM0에 연결된 것을 확인 할 수 있다.
sudo minicom -sminicom 실행

serial port setup에서

다음과 같이 변경한다.

저장 후
exit

////
우분투 버전에 맞게 ROS 버전을 선택해야한다.
우분투 16.04 - kinetic
18.04 - Melodic morenia
20.04 - Neotic Ninjemys
https://whiteknight3672.tistory.com/248
Ubuntu 18.04 + ROS Melodic 설치 방법 정리
필요한 우분투와 ROS 버전 확인 설치 전, 리눅스 버전에 대해 설명드리겠습니다. ROS는 Debian, Windows 10 등 다양한 OS에서의 작동을 지원하지만 Ubuntu를 공식지원하며, Ubuntu 환경을 이용하는 유저가
whiteknight3672.tistory.com
ROS melodic설치
1
sudo sh -c 'echo "deb http://packages.ros.org/ros/ubuntu $(lsb_release -sc) main" > /etc/apt/sources.list.d/ros-latest.list'2
sudo apt install curl # if you haven't already installed curl
curl -s https://raw.githubusercontent.com/ros/rosdistro/master/ros.asc | sudo apt-key add -
3
sudo apt update
sudo apt upgrade
4
sudo apt install ros-melodic-desktop-full5 - 환경변수 설정
echo "source /opt/ros/melodic/setup.bash" >> ~/.bashrc
source ~/.bashrc
6
source /opt/ros/melodic/setup.bash7 의존성
sudo apt install python-rosdep python-rosinstall python-rosinstall-generator python-wstool build-essential8 rosdep 초기화
sudo apt install python-rosdep
sudo rosdep init
rosdep update
roscore
/////
GitHub - pineland/px4
Contribute to pineland/px4 development by creating an account on GitHub.
github.com
GeographicLib exception: File not readable 에러
Pixhawk와 ROS를 이용한 자율주행 드론(수정중)
Pixhawk보드와 ROS를 이용한 자율드론 DJI F50기반 쿼드콥터 하드웨어를 기반으로 Pixhawk와 Raspberry Pi(ROS)를 이용하여 자율비행 드론 구현 1. DJI F450기반 쿼드콥터 제작 ◀ 쿼드콥터 H/W 제작(조립) 참.
e3jake.tistory.com
참고 사이트
sudo git clone https://github.com/JetsonHacksNano/installROS.git
cd installROS/
./installROS.sh -p ros-melodic-desktop -p ros-melodic-rgbd-launch

# MAVROS 설치
sudo apt-get install ros-melodic-mavros ros-melodic-mavros-extras
sudo vi /opt/ros/melodic/share/mavros/launch/px4.launch
<arg name=”fcu_url” default=”/dev/ttyACM0:115200” /> # ttyTHS1은 TELEM1, 115200은 픽스호크의 설정속도와 일치해야 한다.sudo chmod 666 /dev/ttyACM0roslaunch mavros px4.launch rostopic list rostopic echo /mavros/imu/data 
값 받아와지는거 확인
/////
이제 qgc가 깔린 지상 서버와 px4와 연결된 jetson nano를 원격으로 연결 해보겠다

mavproxy를 실행할때 out 옵션에 qgc가 깔린 서버 ip를 넣어준다. port는 14550이 디폴트 값인듯

지상 서버의 qgc로 들어가서 통신링크를 사진과같이 추가해 준다.

생성 후 연결을 누르면 자동으로 jetson nano와 연결이 된다.
아래 사진은 QGC에서 원격의 PX4를 인식하는 모습

/////
이 다음 QGC에서 미션 설정후 비행이 안되는 오류가 있었다.
이유는 radio calibration이 안되어서 비행모드가 지정되지 않았기 때문
지금 가지고 있는 조종기가 없어 가상 조이스틱으로 설정해주었다.
https://docs.qgroundcontrol.com/master/en/SettingsView/VirtualJoystick.html
Virtual Joystick (PX4) · QGroundControl User Guide
No results matching ""
docs.qgroundcontrol.com
첫번째로 설정에서 가상 조이스틱 사용하도록 체크해준다.
https://github.com/mavlink/qgroundcontrol/issues/3636
[QGroundControl] Virtual Joystick Radio Roll Calibration not registering · Issue #3636 · mavlink/qgroundcontrol
I'm using Qgroundcontrol 2.9.7b in linux as my ground station and I want to use the virtual joystick without a real RC or joystick radio by setting COM_RC_IN_MODE to 0(Joystick/No RC Checks). I...
github.com
두번째로 QGC에서 기체설정 -> 파라미터 -> commander로 들어가
COM_RC_IN_MODE를 joystick 으로 변경해준다 //근데 빨간색으로 뜨는거보니 에러가 있는듯
여튼 설정을 변경해주면 비행모드 설정이 가능해진다.
비행모드 설명
https://docs.qgroundcontrol.com/master/ko/SetupView/FlightModes.html
비행모드 · QGroundControl User Guide
The Flight Modes section allows you to map flight modes to radio channel(s), and hence to the switches on your radio control transmitter. Both flight mode setup and the available flight modes are different in PX4 and ArduPilot (and there are some differenc
docs.qgroundcontrol.com
'project > 캡스톤 디자인' 카테고리의 다른 글
| gazebo qgc 시뮬레이션 (0) | 2022.04.17 |
|---|

댓글